Top Skylight Installation Plans: A Definitive Guide to Performance
The introduction of daylight through the roof plane is a fundamental architectural maneuver that transforms the volume of a space and the psychological experience of its occupants. Yet, from the perspective of building science, a skylight is essentially a sophisticated breach in the building’s primary defense system. It is a penetration that must navigate the extreme thermal gradients of the attic or plenum, manage the kinetic energy of rain and snow, and maintain structural integrity under varying wind and ice loads. Top Skylight Installation Plans. To approach this task without a rigorous technical framework is to invite systemic failure.
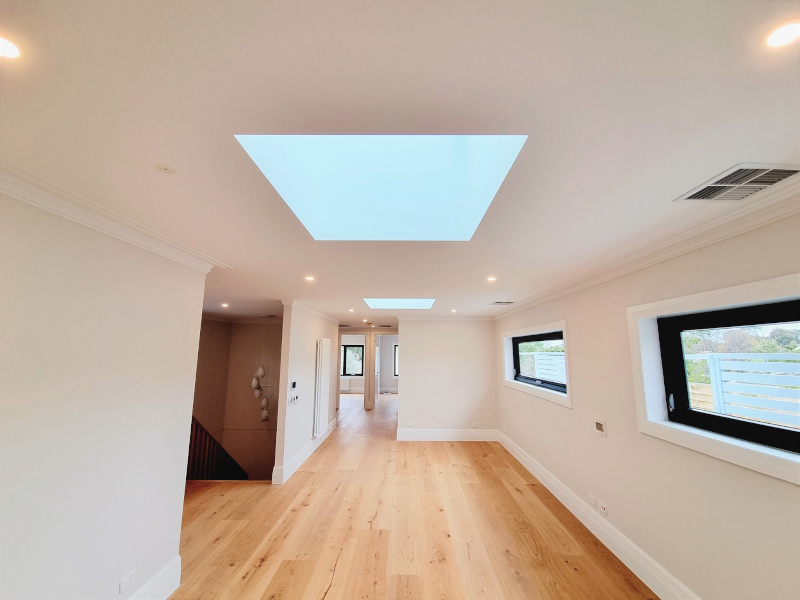
Modern skylight integration has moved far beyond the “bubble” acrylic domes of the late 20th century. Today’s fenestration technology involves a complex interplay of spectrally selective coatings, thermally broken frames, and integrated flashing systems designed to last as long as the roofing material itself. The challenge for the homeowner or architect is to synchronize the desire for natural light with the realities of the thermal envelope. Every skylight represents a trade-off in R-value, replaced by the dynamic benefits of solar heat gain and circadian lighting.
Developing a robust strategy for these apertures requires a deep dive into the physics of the roof-to-aperture transition. The failure of a skylight project is rarely due to the glass itself; it is almost always a failure of the “plan”—the intersection where the waterproofing membrane meets the frame and where the interior light shaft manages vapor diffusion. This analysis provides the authoritative groundwork required to execute these complex installations with precision and longevity.
Understanding “top skylight installation plans”
When professionals discuss top skylight installation plans, they are referring to a multi-phase technical roadmap that prioritizes the continuity of the building’s weather-resistive barrier (WRB). A common misunderstanding among laypeople is that a skylight is a standalone product. In reality, it is a sub-system. The “plan” must account for the pitch of the roof, the type of roofing material (asphalt, metal, or tile), and the internal structural framing—specifically whether the roof uses rafters or engineered trusses.
Oversimplification in this sector often ignores the “light shaft” dynamics. If a skylight is installed on a vaulted ceiling, the connection is direct. However, on a flat ceiling with an attic space above, a light shaft must be constructed. This shaft becomes a new wall within the home, requiring its own insulation, vapor barrier, and drywall finish. Failure to plan for the thermal performance of this shaft leads to “cold spots” and localized condensation, which can be mistaken for a roof leak.
Another critical perspective involves the solar orientation. A plan that places a large skylight on a south-facing roof without considering the Solar Heat Gain Coefficient (SHGC) is a plan for a summer greenhouse. The best plans use data-driven selection, utilizing spectrally selective Low-E coatings to allow light in while reflecting infrared heat. Understanding these plans requires shifting focus from the “view” to the “vulnerability” of the roof penetration.
Historical and Systemic Evolution of Overhead Fenestration
The use of overhead light dates back to the Roman Pantheon’s oculus, a literal hole that allowed both light and weather to enter. The industrial revolution introduced the “sawtooth” roof for factories, utilizing large glass panes to illuminate industrial processes before the advent of reliable electric lighting. These early systems were notoriously leaky and thermally inefficient, relying on constant maintenance and massive heating systems to offset the energy loss.
The 1950s and 60s saw the rise of acrylic domes. While these were lightweight and less prone to shattering, they lacked any meaningful insulating properties and became brittle under UV exposure. The “bubble” skylight became synonymous with the “leaky skylight” reputation that still haunts the industry today.
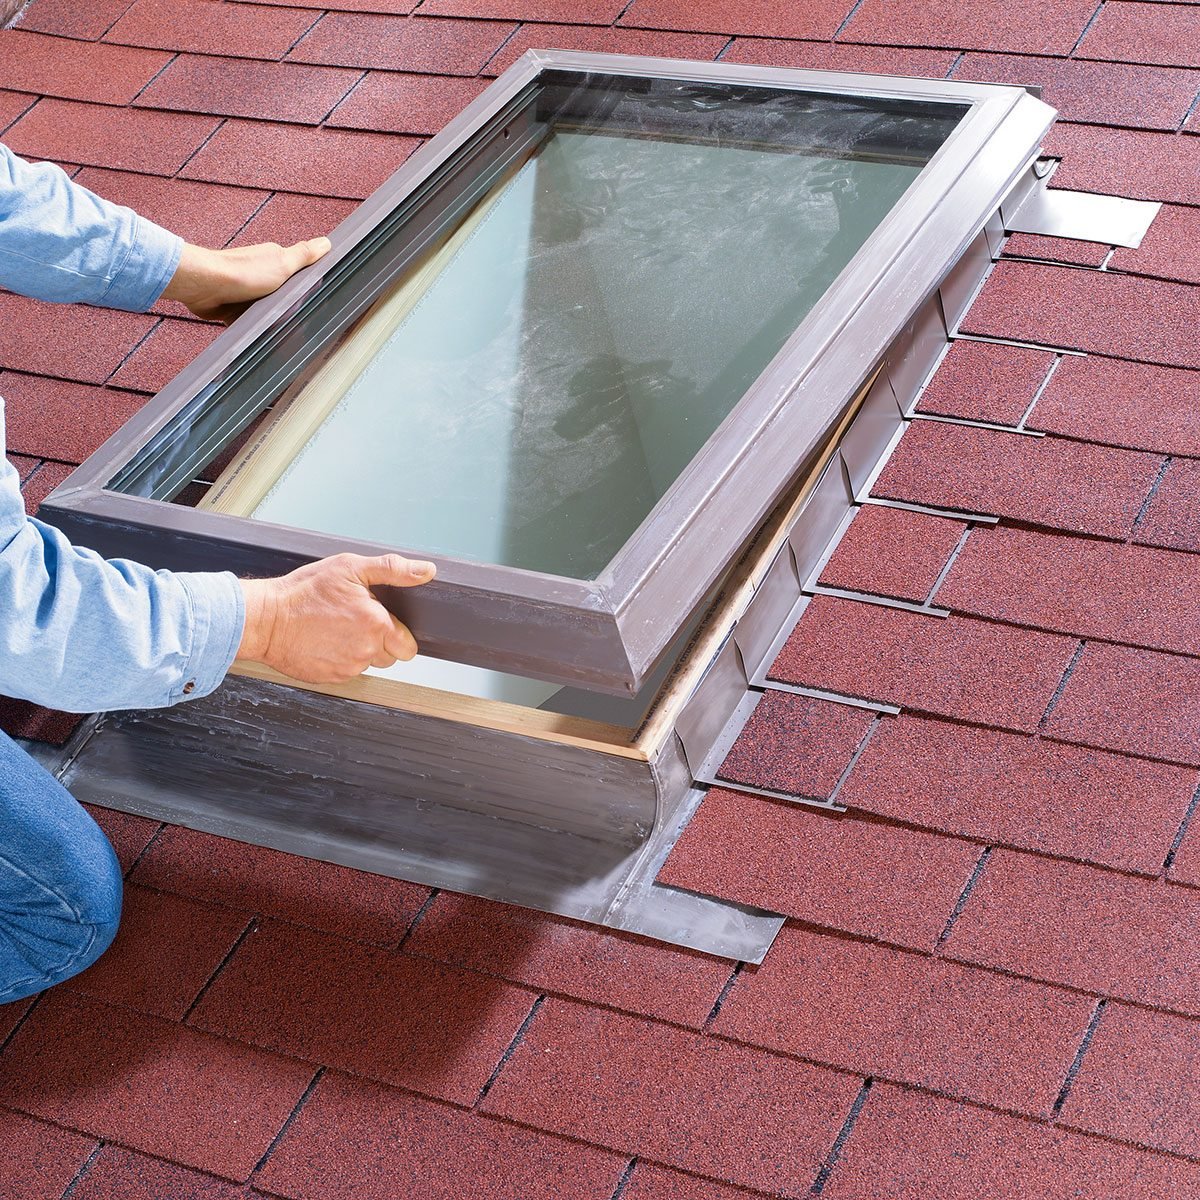
Contemporary evolution has been driven by the “Warm Edge” technology and the development of the “Deck-Mounted” vs. “Curb-Mounted” installation methodologies. We now utilize IGUs (Insulated Glass Units) filled with argon or krypton gas, featuring laminated glass for safety. The system has shifted from a “barrier” approach—trying to keep water out with caulk—to a “water-shedding” approach, where integrated flashing kits use gravity and lapping to move water around the unit.
Conceptual Frameworks for Installation Logic
To evaluate a skylight plan, one must apply specific mental models that go beyond the brochure.
1. The Hydrostatic Pressure Model
This framework assumes that at some point, water will sit on the skylight. Whether through ice damming or heavy debris buildup, the installation must be able to withstand temporary standing water. This model prioritizes the “underlayment” phase—where a self-adhering ice and water shield is wrapped up the sides of the skylight frame—over the final metal flashing.
2. The Vapor Diffusion Port Framework
The light shaft is a chimney for interior moisture. Because warm air rises, the humidity from cooking and bathing will settle at the highest point: the skylight glass. This framework dictates that the interior seal must be more airtight than the exterior seal to prevent moist air from entering the light shaft wall cavity and rotting the roof deck.
3. The Structural Integrity Matrix
A roof is a tensioned system. Cutting a hole in it disrupts the load path. This model evaluates whether “headers” are needed to transfer the weight of the roof to adjacent rafters. In truss roofs, the framework is even more rigid; you cannot simply cut a truss without an engineer’s approval, leading to the use of “tubular” skylights that fit between the cords.
Key Categories and Material Trade-offs
A comprehensive comparison is essential for selecting the right system.
| Category | Primary Benefit | Significant Trade-off | Ideal Use Case |
| Fixed Deck-Mount | Low profile; high airtightness | Cannot provide ventilation | Modern vaulted ceilings |
| Curb-Mount | Versatile for flat/low pitch | Bulkier appearance; more labor | Re-roofing projects; flat roofs |
| Solar-Powered Venting | Fresh air; no wiring needed | Mechanical complexity; higher cost | Kitchens and high-humidity baths |
| Tubular (Sun Tunnel) | Fits between trusses; low cost | No view to the sky; limited light | Hallways and walk-in closets |
| Roof Windows | Accessible for cleaning; egress | Complex flashing; high price | Finished attics and lofts |
Realistic Decision Logic
The path to the right plan follows a hierarchy: Roof Pitch → Ceiling Type → Lighting Goal → Ventilation Need. If the roof pitch is below 3:12, a curb-mounted unit is mandatory to raise the glass above the drainage plane. If ventilation is the goal to reduce cooling loads via the “stack effect,” an operable solar-venting unit is the superior, albeit more expensive, choice.
Detailed Real-World Scenarios Top Skylight Installation Plans
Scenario 1: The “Truss-Bound” Hallway
A homeowner wants natural light in a dark interior hallway, but the roof is supported by engineered “W” trusses.
-
Constraint: Trusses cannot be cut without catastrophic structural risk.
-
The Plan: A 14-inch tubular skylight.
-
Failure Mode: Attempting to “frame out” a standard rectangular unit, which would require massive structural reinforcement and engineering fees.
Scenario 2: The Vaulted Kitchen
A kitchen with a vaulted ceiling suffers from heat buildup and poor light.
-
Constraint: High humidity from cooking.
-
The Plan: A solar-powered venting skylight with an integrated rain sensor.
-
Second-Order Effect: The “stack effect” will draw cool air from lower windows while exhausting heat, reducing AC reliance. However, the plan must include an insect screen that is easily cleaned from below.
Planning, Cost, and Resource Dynamics
The financial commitment to a skylight is 40% material and 60% labor and interior finishing.
Estimated Cost Brackets (Installed)
| Quality Tier | System Type | Est. Cost (USA Avg) | Lifecycle (Years) |
| Economy | Fixed Tubular | $800 – $1,500 | 20+ |
| Mid-Range | Fixed Deck-Mount | $2,000 – $3,500 | 25 |
| Premium | Solar Venting | $4,000 – $6,500 | 20 (Motor life) |
| Elite | Custom Walk-on / Glass Roof | $10,000+ | 30+ |
Opportunity Cost: Choosing a fixed unit over a venting unit saves $1,000 initially but loses the “passive cooling” benefits that could save $100/year in electricity over 20 years.
Tools, Strategies, and Support Systems
Executing the top skylight installation plans requires more than a hammer and nails.
-
Infrared Thermography: Used during the planning phase to identify heat loss patterns and during the evaluation phase to check for air leaks.
-
Liquid-Applied Flashing: A high-performance strategy for complex roof shapes where traditional metal flashing cannot create a perfect seal.
-
Self-Adhering Membranes (Ice & Water Shield): The “hidden” hero of the plan; it must be installed in a “shingle-fashion” to ensure water flows over the laps.
-
Telescopic Poles and Home Automation: For operable units, the support system must include a way to control the unit when it is 12 feet above the floor.
-
Spectrally Selective Coatings: Choosing the right “tint” or Low-E coating based on the regional climate zone (North vs. South).
Risk Landscape and Failure Modes
The primary risk of a skylight is not “leaking” in the traditional sense, but “compounding failure.”
-
The Condensation Trap: If the light shaft is not insulated to the same R-value as the rest of the attic, moisture from the home condenses on the cold drywall, causing mold that looks like a roof leak.
-
Expansion/Contraction Stress: Materials move at different rates. If a skylight is “pinned” too tightly to the roof deck without room for thermal movement, the glass seal can fail, leading to fogging.
-
Ice Damming: Skylights lose more heat than the surrounding roof. This heat can melt snow, which then refreezes at the cold eaves, backing water up under the skylight flashing.
Governance, Maintenance, and Long-Term Adaptation
A skylight is a mechanical aperture that requires a formal “Review Cycle.”
-
Annual Audit: Clearing the “saddle” (the top flashing area) of leaves and pine needles. Debris here acts as a sponge, holding water against the seals.
-
Five-Year Check: Inspecting the rubber gaskets. UV rays eventually degrade the elasticity of the seals.
-
Adjustment Triggers: If you see “clouding” between the panes, the argon gas has escaped. The unit is now thermally compromised and should be scheduled for replacement before it begins to leak.
Measurement, Tracking, and Evaluation
How do you evaluate the success of a skylight plan?
-
Leading Indicator: The “U-Factor” and “SHGC” ratings. These predict how the unit will behave before it is even installed.
-
Lagging Indicator: The “Mean Radiant Temperature” of the room. If the room feels drafty in winter, the thermal break or the light shaft insulation has failed.
-
Documentation: Keep the “Flash Code” or serial number of the unit. Modern manufacturers like Velux use these codes to provide perfect-fit replacement parts decades later.
Common Misconceptions and Oversimplifications
-
Myth: “Skylights will always leak eventually.”
-
Correction: Modern flashing kits, when installed with a 3-layer protection system (deck seal, adhesive underlayment, and metal flashing), are as waterproof as the roof itself.
-
-
Myth: “They make the room too hot.”
-
Correction: Only if you choose a high-SHGC glass. Modern Low-E3 glass reflects 65% of solar heat while letting in 95% of light.
-
-
Myth: “You can’t have a skylight with a flat ceiling.”
-
Correction: You can; it just requires a “light shaft.” This often provides more dramatic, diffused light than a vaulted install.
-
-
Myth: “Acrylic is better because it won’t break.”
-
Correction: Laminated glass is just as safe (it stays in the frame if broken) and offers vastly superior sound dampening and thermal insulation.
-
Conclusion: Synthesis of Performance and Light
A successful skylight installation is a triumph of building science over environmental stress. The top skylight installation plans are those that treat the aperture not as a window in the roof, but as a sophisticated thermal and water management system. By understanding the historical failures of the past and the structural logic of the present, homeowners can illuminate their lives without compromising the integrity of their shelters.
The ultimate goal is a “quiet” installation—one that provides the transformative power of the sun while remaining invisible in its performance, silently shedding water and retaining heat for decades to come.